Frequently Asked Questions
×
connection
No Devices Found / Getting Started
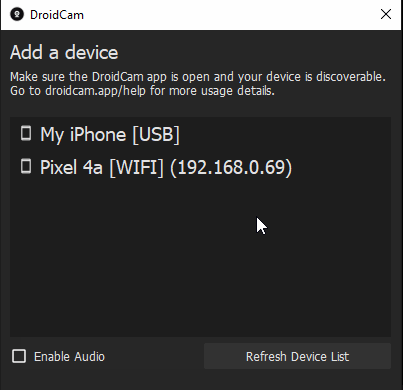
If the PC Client cannot find your device (WiFi discovery does not work), try adding the device manually:
In the DroidCam Client, click [Refresh Device List] 3 times and you will be presented with the option to add a device manually.
Enter the WiFi IP as shown in the phone app.
(more)
No Connection / No Video / Blank App
If video does not start after adding a device:
Try restarting your WiFi router: unplug from power, wait for it to discharge (~30s), plug back in and let it start up.
Ensure the computer and the phone are on the same network. Both Wired (Ethernet) and Wireless (WiFi) connections are fine.
If you have both 2.4Ghz and 5Ghz WiFi networks active, all devices should be on the same band.
Check the "Bind IP" option under Advanced section of the DroidCam Client settings.
If your computer has multiple network interfaces, select the correct one for your WiFi and re-start the Client.
If your computer has VPN software installed, try connecting DroidCam before enabling VPN, or connect the app via USB to bypass the VPN.
If extra Firewalls are present on your computer / your phone / your router - these might block the connection.
Firewalls are usually present on corporate or school networks, and connecting via USB (or a WiFi hotspot) is the recommended workaround.
If you have a company managed computer:
Check if network protection is enabled in Windows Defender, which could block the DroidCam connection.
If you wish to disable this feature (at your own risk):
Type powershell in the Start menu, right-click 'Windows PowerShell' and select 'Run as administrator'.
Enter the following command: Set-MpPreference -EnableNetworkProtection Disabled
Video Lags and Keeps Disconnecting
If the video connection starts but is not smooth, a more stable signal is required.
DroidCam transmits data with very low latency expecting minimal interference.
If you are using WiFi,
1. Lower the video options:
* In the phone app, open the Settings and under the Video section: ensure
(1) Quality is set to 'Normal', (2) "Advanced Options" are OFF (Android-only).
(3) Under the Camera section set "Target FPS" to 30.
* In the DroidCam Client, open the Settings and change the video size to 1280x720 and FPS to 30.
Delete & re-add your phone in the client.
2. Try restarting your WiFi router: unplug from power, wait 30s for it to discharge, plug back in and let it start up.
If you have both 2.4Ghz and 5Ghz WiFi networks active, all devices should be on the same network (including wired Ethernet connections) for best performance.
3. If possible, use DroidCam via USB.
USB connections will be more stable in general due to lack of interference and packet loss.
If you have an older phone:
try changing the video format.
In the PC client, double-click on your DroidCam source and in the source Properties, change the 'Video Format' from 'AVC' to 'MJPEG'.
Android only:
If transmission stops after a while, your system may be restricting DroidCam as part of battery optimizations.
Some Android manufacturers have introduced restrictions preventing apps from keeping wake locks and working in the background.
You can disable these restrictions by connecting the phone to power, or disabling battery optimizations in the system settings.
Consult dontkillmyapp.com which has listed various solutions for different Android brands.
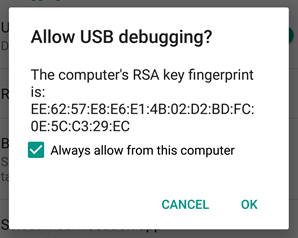
USB Setup
image
HD Video (720p, 1080p)
In the DroidCam client, use the File menu to access the Settings.
Open the Video section and change the resolution to 1280x720 (for 720p HD) or 1920x1080 (for 1080p FHD).
Remove and re-add your phone if the transfer resolution does not automatically change.
1280x720 is the recommended option for DroidCam for optimal balance of quality and performance.
Video pixelation / Low image quality
In the phone app, open the Settings and set Video Quality to 'High' or 'Very High' to reduce the pixelation.
Android-Only: If you have fast WiFi or a good USB connection, you can enable Advanced Options here
and select a custom bitrate for more precise bandwidth control (recommended for advanced users only).
Rotation / Mirror / Flip / Portrait Mode
In the DroidCam client right-click on an input source and use the "Transform" menu to adjust the image.
For Portrait (tall) video, add a 90° transform and rotate your phone physically.
![]()
Brightness / Contrast / Color correction
In the DroidCam client right click on an input source and open the "Filters" window.
Add a Color Correction effect and adjust the values as needed.

60 FPS
1. In the phone app, open the Settings and change the Target FPS option (under the Camera section).
2. In the DroidCam client, use the File menu to access the Settings and change the video FPS to 60.
The app will display the active "AE FPS" range when video starts.
Android: Some Android phones limit camera features for local video recording only,
in which case DroidCam will not be able to deliver higher resolutions / fps.
See "Android Device Support" below for details.
Android Device Support
Some Android phones limit camera features to their own apps or for local video recording only, in which case DroidCam will not be able to take full advantage of available hardware.
For example, most Samsung devices only allow 30FPS capture for non-native apps.
[-]
You can download a camera inspector to see which features your phone supports for non-native apps:
https://play.google.com/store/apps/details?id=com.airbeat.device.inspector
Google Pixel devices usually have the best support for all available hardware and are the recommended option for DroidCam.
4K Video
As a webcam, DroidCam supports up to 1080p Full HD video.
Note that most video calling platforms (Zoom, Teams, Discord, Skype, ..) use 720p,
with limited 1080p support usually for enterprise customers.
This makes 1080p Full HD more than sufficient for general use.
720p also is the recommended option for DroidCam, this provides optimal balance of quality and performance (see 'HD Video' section above).
4K video is supported when using the DroidCam OBS plugin for video production.
Check the DroidCam OBS section for more info.
sound
Enable Audio transfer
You can enable audio transfer by ticking the 'Enable Audio' option when adding a DroidCam source.
Sound will be routed to the "Droidcam Audio" microphone on your system, which can be used as an input device in other programs.
Note that audio quality and latency may vary, and using Droidcam for video-only is highly recommended.
Audio is not smooth / Audio choppy
DroidCam transmits data with very low latency expecting minimal interference. You may experience some audio breaks due to network interference.
To compensate, you will need to add a delay (buffering) to your DroidCam source (or connect via USB instead of wireless).
To add the delay, in the DroidCam Client
Open the 'Advanced Audio Properties' in the Audio Mixer

Add a Sync Offset to your DroidCam source (at least 100ms)

Next, right-click on your DroidCam source and open the 'Filters' menu. Here, add a 'Video Delay' filter with the same value (at least 100ms).

Note that this delay will now take effect when using Droidcam as a webcam in other programs
configuration
Battery Optimizations
Transferring video for long durations will put extra strain on your phone.
DroidCam is optimized to save resources where possible.
* Do not enable audio, this uses extra CPU. If posible use a regular microphone instead.
* Keep the phone at 100% charge and connected to power to avoid any battery usage and extra heat.
* Dim the phone screen to reduce resource usage more (Auto-Dim can be found in the apps Settings).
* Place the phone in a way that will let it dissipate heat, away from other heat sources.
* Do not max out the video options. In the phone app, keep "Advanced Options" off and use the "High" or "Very High" video quality in the settings.
* Use 1280x720 (HD) video resolution and target FPS at 30. This will lower resource usage while maintaing HD video quality.
Remote Camera Controls
Remote controls are part of the Pro upgrade in the phone app, and allow you to control various
aspects of the camera from the PC (zoom, exposure level, focus mode, etc).
With the DroidCam Client, use the "View" menu to access the "Controls" dock.
Read more below
Change the DroidCam Port
DroidCam uses port 4747 by default. You can change the DroidCam Port in the phone app Settings. Valid port numbers are between 1024 - 65536.
In the computer client, add your phone then open its Properties in the sources area.
Click [Deactivate] to disable the source and change the "DroidCam Port" entry here.
Click [Activate] to re-enable the source.
If video does not start, Deactivate and click [Refresh Device list]. Re-select your phone in the "Device" drop-down and try again to Activate.
UnInstallation
Exit all programs to ensure DroidCam is not in use and avoid issues.
Windows PCs
Use Programs and Features in Control Panel to remove the DroidCam Client & the DroidCam Drivers.
If you are having trouble removing the client or the drivers –
reboot Windows into Safe Mode
and uninstall then.
Required Permissions
DroidCam requires Camera, Microphone, and Notifications permissions to function.
Camera: required for video capture, to use your phone as a webcam.
Microphone: required for audio capture. Only used if you tick 'Enable Audio' when adding a DroidCam source on the PC.
Notifications (Android): required to display a notification while the app is in use.
This helps indicate that the app is important and makes it less likely that the system will freeze the app during longer sessions.
This also allows DroidCam to stay connected while in the background and while the screen is off.
pro upgrade
Pro Upgrade: reset / restore / switch phones
In-App purchases are added to your (Google Play or Apple iCloud) account and will carry over to new devices.
Use the [Restore Purchase] option in the DroidCam app to restore your Pro Upgrade.
Note that Apple and Google handle their appstores independently and the pro upgrades are separate on each platform.
If you have multiple accounts on your phone, DroidCam must be installed with the correct one (which owns the purchase).
This is especially important with the Google Playstore where you can have multiple profiles.
If you are having trouble restoring the purchase:
On the phone ensure both dev47apps.com and the appstore load correctly.
You may need to switch off VPNs, if one is present.
Android Only:
Try using the Playstore website
to install the app to your phone using the correct account.
iOS Only:
Ensure in-app purchases are allowed in Screen-Time Settings.
Check your purchase history:
– Google Play Store purchase history
– Apple App Store purchase history
Pro Upgrade: no GMS direct purchase
You can purchase DroidCam directly for use on Android phones without the Play Store and Google services (GMS), for example if you have a Huawei device or a more privacy focused system: Read More.
Does the pro upgrade apply to all DroidCam apps?
The Pro upgrades are per app variant and do not carry over.
1.
DroidCam/X (Classic)
on Android (the original DroidCam apps).
2.
DroidCam Webcam & OBS Camera on Android (current app).
3. DroidCam Webcam & OBS Camera for iOS.
other
OBS Studio
OBS Studio is a popular open-source project and the DroidCam PC client is a modified version of OBS.
Existing OBS users do not need to get the client and can use the
DroidCam plugin for direct and easy integration.
Note that DroidCam is developed and maintained separately, it is not connected or affiliated with the OBS Project and its authors.
DroidCam / DroidCamX (Classic)
On Android, the new ![]() DroidCam app & client are separate from the classic
DroidCam app & client are separate from the classic
![]() DroidCam apps & client.
DroidCam apps & client.
DroidCam on iOS is universal, and works with both the classic and new clients.
Windows 7 and 32-bit support
The current DroidCam Client (v7+) requires Windows 10 at minimum. For older systems, you can use the classic
![]() Droidcam app & client (v6).
Droidcam app & client (v6).
Report a problem
Please contact [email protected] if you experience issues.
Include your system details (phone: iOS or Android, computer: Windows or Linux), and details about the problem.
If the issue is with the DroidCam Client, use the Help menu in the Client to find and attach the latest log
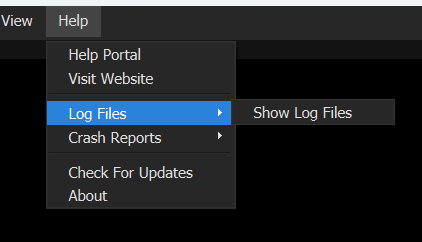
 USB connections require the Apple USB drivers.
Windows will automatically install drivers in most cases.
To verify: hit the Windows key, search for Installed Apps.
USB connections require the Apple USB drivers.
Windows will automatically install drivers in most cases.
To verify: hit the Windows key, search for Installed Apps.


